Pages

Wheat Crackuh!

Thursday, July 29, 2010 0 comments

Wheat Crackers
Prep time: 10 minutes
Ready in: 30 minutes
Cook Time: 20 minutes
Servings: ~40

This thin wheat cracker is simple and thrifty to make. It will taste great with any dip or spread. Experiment with adding different things like herbs or sugar. (I'm eating mine with my soup and pepperjack cheese today and they're DELISH! These taste a lot like wheat thins if you do them the way I recommend at the bottom)

Ingredients:
1 3/4 cups whole wheat flour
1 1/2 cups all-purpose flour
3/4 tsp salt
1/3 cup vegetable oil (I used melted butter)
1 cup water
2 Tbs sugar or molasses (I used honey)

Directions:
In medium bowl stir together flours and salt. Pour in oil, sugar and water and mix until just blended. 
On a lightly floured surface, roll out dough as thin as possible- no thicker than 1/8 inch. You can also roll out onto the cookie sheet and tear off extra dough. 
Place dough on an ungreased baking sheet, and mark squares out with a knife but dont cut all the way through. Prick each cracker with a fork a few times and sprinkle with salt.
Bake for 15-20 minutes in a 350 degree oven or until light brown and crisp.  Baking times will be different depending on how thin your crackers are.  When cool, remove from baking sheet and seperate into individual crackers.

Ok, I changed a few things on this recipe that I think helped with technique and flavor.
I used melted butter instead of oil and honey instead of sugar or molasses. 
I tried rolling the dough out on the pan, but you need a rolling pin without handles if there are edges on your tray. darn. so I just rolled it out on floured wax paper and it worked great and was easy to transfer to the pan cause I just flipped it over onto it and removed the wp from the top.
I wanted to make sure that the salt i sprinkled on top of the crackers stayed on them so I  did a quick spray with pam and then sprinkled and waa laa. it stuck. 
After I removed the crackers, I broke/cut them apart and removed the ones that were crispy enough and jumbled up the remaining crackers and placed them back in the oven for 5-10 more minutes to crispy them up. 
Word to the wise: These are really tasty, but there are two things you need to do to ensure that they turn out in a desirable fashion:
1. when the recipe says to roll them out as thinly as possible, it's not lying. it really means THIN. 1/8 inch is way too thick.  You will have thick chewy cracker bricks of you ignore this advice.
2. If you put an oven safe bowl with water in the corner of the oven it will help crispy these up (as it will with any bread crust you bake, just so you know)

Whew! Now that I've got THAT out of the way... I don't really have that much to say that I didn't say in the last recipe post. 
OH except that I'm finally registered for school now. I'm taking Honors English, Spanish, Exercise Physiology, and Rock History. :) fun fun!
Also, The boot camp I teach is going great in the mornings at 5am!  You all should come! Clarissa has started coming- you rock, girlfriend! (I'm totally channeling you, Lori) 
School starts for the kids two weeks from yesterday. any ideas what I should be sure to do with them before I lose them (and myself) to the impending attendance in the education system?
I also have taken a "break" from facebook. I still comment periodically but it's rare and nothing compared to what I did before. Now I've replaced it with blogging. oh brother. oh well, I look at it as journaling, but I'm going to have to curb even the blogging so I can pay closer attention to real life!  I mean, I have to have something to blog about, right ?? lol. 
Y'all need to post some recipes on here! Get on that, ladies!
Keep Reading >>>

Peanut Butter Cookies (gluten free)

Tuesday, July 13, 2010 0 comments
I'm in a cookie frenzy lately. Last week my sister gave me some flourless peanut butter cookies that were oh so yummy! She based them off of Paula Dean's "Magical Peanut Butter Cookie" recipe, and made some changes.
Then after buying my first coconut sugar -HURRAY- I rushed home and made oatmeal heart cookies from Ali and Tom's AMAZING food blog "The Whole Life Nutrition Kitchen" at www.nourishingmeals.com. (Seriously, I've finally found my food blog!!!) They were AMAZING!! I ate too many and got a bit sick :( But they were AMAZING!!
Today I was hankerin' for cookies again (I tell you once the ball gets rolling...) I checked out Paula Dean's recipe and it seemed really simple :-) I don't use regular sugar and I'm not a believer in chemical artificial sweeteners, and as usual I couldn't help but make a few changes of my own.

This is the first recipe I've posted using *coconut sugar* It is a new discovery I've made in the sugar alternative world. After learning that while Blue Agave is low-glycemic, it is very high in fructose, supposedly increasing insulin resistance, is highly processed and is not sustainably harvested, I needed to find another low-glycemic substitute. Not to mention the fact that it doesn't bake well at all. All because of the amazing www... I learned about coconut sugar, it being low glycemic - at 35 on the GI, very sustainable (the sugar is tapped off the flower and regenerates quickly - without killing the plant as is the case with agave) and a high nutrition profile. It seemed to be the perfect answer.
As far as baking goes, it is SO much better than agave, and tastes beautiful. It comes in granulated form, and tastes a little bit like brown sugar or caramel. Unfortunately, it is still sugar and SO yummy it's hard for me to limit myself to just one or two cookies, and it kicks off the cravings in my brain... So too much still makes me sick, but a little bit is alright. It is also expensive, but that is actually good thing because then I will save it for true special occasions.


1 cup natural peanut butter*
1 egg
2 T honey
2 T - 1/3 c coconut sugar (or brown sugar)
1/2 tsp vanilla or imitation vanilla
1/4 c unsweetened shredded coconut (opt)
pinch of salt

Mix all ingredients with a hand mixer, roll into small balls - the size of a walnut shell. Press down with a fork. No need to grease a cookie sheet. Bake at 350 degrees F for 15-18 minutes, cool on wire rack.

My boys are my toughest critics. Cory hasn't tried them yet but Ethan gobbled them up :-) That made me smile.

*I learned a trick for stirring my natural peanut butter.... I poured the whole jar into a bowl and mixed it with a hand mixer -duh I don't know why that took me 28 years to figure out- Saved me about 10 minutes of careful stirring. I used the bowl and beaters to mix up this cookie batter, so no extra dishes :) Next time I'll let the kids scrape out the peanut butter with apple slices or something.
Keep Reading >>>

My No-Fail Fall-Back: Chicken and Potatoes

Friday, July 2, 2010 2 comments
Heya ladies!
I'm loving this blog!  you ladies rock!
I was trying to think of a recipe to post on here and I thought, "hey, I'll just post what I make when I can't decide what to make!"  So here 'tis!

Chicken and Potatoes
2 cans of some kind of cream soup (I usually like to do 1 crm of chicken and 1 crm of mushroom)
1 can water (soup can)
4 sliced russet potatoes (optional)
6 chicken breasts, frozen (if not frozen cut cooking time to 45 min +15 min b.crumb time=1 hr)
6 slices cheese (I usually like to use swiss [even for those who dont like swiss, this is delicious], but I've done cheddar)
1 cup seasoned bread crumbs sold in a paper canister at the store
1/4 c butter, melted

Assemble:
-line bottom of 9x13 with potatoes
-place chicken in dish
-put a slice of cheese on each chicken breast
-mix 1 can water and soups in seperate bowl and then pour over chicken dish
-cover with tinfoil
-place in 375 oven for 1 hour 45 minutes
-meanwhile, mix bread crumbs and butter until b is evenly dispersed.
-at end of time remove tinfoil and sprinkle bread crumb mixture over chicken
-put back in oven, uncovered for 15 minutes until the crumbs are golden

Enjoy!  Serves 6. (but easily halfable) Use sauce on veggies and anything else on your plate!  You can also omit the potatoes from the recipe and serve this with rice, quinoa, baked or mashed potatoes. oober delish.

Family Update:
k, first I have to say that, Clarissa, I'm going to be saying DONG for a while now- I laughed so hard when I read that. 
Since so many awesome benefits are being offered with the change in housing management, I will be starting school in the fall to pursue my texile design and business degree so we can stay and enjoy the perks.  Since Matthew starts kindergarten in August, I'll be an empty nester.. at least for half a day, and it's the perfect situation to get a bit of education in :)  Really, Aaron just hasn't gotten in to professional school yet and until we know what's happening with that we dont want to jump the gun and move.  So many people have moved out and back in and we just want to avoid the stress and finiancial burden that accompanies such an anti-exodus. Dont worry, we wont be here a decade, I promise. Megan is at broadway kids camp right now and tonight will be her performance at chandler center for the arts. She has speaking lines and a solo. I'm excited! She's such a ham.

Yesterday Brittney Walker accompanied me to my "managers" recording room (that sounds so pretencious. manager) and I laid down a couple vocal tracks. It was super neat and I can't wait until he sends me some mp3s!  I've been messing around with my recording software and you can hear some of the files on my myband tab on facebook, but I dont have good recording equipment- it was amazing to hear what a difference the equipment made. sooo fun!

I've been instructing a bootcamp happening every weekday morning at 5:30am at the basketball/volleyball courts in the center of campus by the dorms. it's off of Avery and Williams Campus Loop South/Unity. Come and shed some inches for summer!  Oh yeah, and it's FREE, peeps.  Can't beat free!

Last but not least, CRAFT night is happening every week and for those of you who are still here, we want you here! -And if you've moved but are close enough to come still, get your booty in gear and craft with us!  We had 8 ladies there last night and it was fun. you can see the headband and zipper flower I made last night on my facebook pictures album called design portfolio.  Come every Thursday at 8pm at the Rowan Community House, yo.  Get your craft on!  Shumway, out.
Keep Reading >>>

Seafood Lasagna, Italian Chicken Salad & a fabulous restaurant!

Wednesday, June 9, 2010 3 comments
This was soo yummy! I used shrimp and tilapia fish. I marinade the seafood in lemon juice, pepper and garlic salt. Then layered it with alfrado sauce and parmesan cheese. Next time I think I will add cottage cheese, I would have last time but I didn't have any. I cooked the noodles first to reduce the time in to oven. (hum.. hello cause it makes my house a million degrees!!)


I also put breadcrmbs and butter on the top and then put it in the oven for abut 30 minutes. It ended up being super good!


This one is really just kinda silly, but it was so yummy and I felt so healthy eating it. I fried the chicken in Italian dressing and then made my salad with, apples, feta cheese, candied walnuts, lettus and tomato. I didn't have to use any more dressing once it was done, the dressing from the chicken was enough and it was soo yummy.


Even Bou liked it!

Now, I realize this is not a recipe but DANG! 
(haha I accidently just typed dong, lol that would have been funny.)
This place was AMAZING! I would go there again just to look at their adorable highchairs.

Or the fresh flowers.. or to the delicious apple jam.

But wait- the food is DELICIOUS too! 

and the portions are HUGE! ^That's a kids meal! ^

The Kohn's took us here and I promised the owner, Tom, that we would be back again, and again, and again... It was sooooo good. Ashley and Katie kept making fun of me because I was going gaga and taking pictures of everything! The place is called 
TC Eggintons,
 and they are only open for breakfast and lunch. Tom said he has been open for 25 years, and I wouldn't be surprised if they were open for another 25. They are located at Alma School and the 60. I am not even joking this place was amazing. I told Tom I was going to Blog about and tell everyone I knew about it. (He probably thought I was crazy!) You have to go there!


Keep Reading >>>
Thursday, May 20, 2010 1 comments
ORANGE CHICKEN
(and it's gluten free, but I bet you couldn't tell!)

I have wanted to try making gluten free fried chicken for a while now. It seemed there were a few months that every time I turned on Food Network, someone was making fried chicken. At first I pouted - "but I can't have wheat!" And then it occurred to me that wheat flour is not the only option! So the wheels started turning...

I've tried making fried chicken before, and it never turned out the way I thought it should. The breading didn't stick, or it was soggy,and the chicken was dry. Well, all those Food Network cooking shows paid off. I got several tips from each show, and paid special close attention to the tips that more than one person mentioned.
  • oil temperature. The oil has to be at 375 degrees when you drop your food into it. It will initially drop the temperature, which you'd like to be at about 360 for cooking. So starting at 375 is perfect. All of the cooks stressed this point.
  • add salt immediately upon pulling out the fried food - while it's still hot, it pulls the salt in, creating a nice season - after the food cools it will tend to fall off.
  • Brine the chicken. Only one of the cooks suggested this, but he was from the south so officially he gets my vote of confidence. I did do this and the chicken was super juicy on the inside.
  • let the breaded chicken rest at room temperature for a few minutes before dropping in the fryer. Two different cooks brought this up. I forgot the details of the explanation, but it had something to do with helping the breading staying on the chicken. I guess cold chicken doesn't like it's breading as it goes into the hot oil.
  • double dip - egg wash, flour, egg wash, flour. I didn't do this because I didn't want to use that much flour/starch. And I thought I'd try it the other way first to see how it turned out. It was fine without it but eventually I'd like to try it and see how it fares. (It was a tip from the "South Guy" again)
  • use a deep, heavy pot as it will hold the temperature better, and of course prevent burns and messes from SPITTING GREASE!!! dun dun dun.


Here's what Cory and I had - Orange Chicken :) Yum. Recipe to follow. Here is the original recipe: "
Panda Express Orange Chicken"

Here is the recipe with my changes:

1 1/2 lbs chicken tenders, cut in 2 inch pieces
2 eggs
2 tsp salt
white pepper
Canola Oil (for frying) - I used about a quart
3/4 cup potato starch or corn starch
1/2 cup rice flour (can use wheat flour)
1 Tb ginger root, peeled and minced
1 Tb garlic, minced or pressed
1 pearl onion, with green top (This is what was in my garden, I'm sure just green onions would be fine)
2 carrots, peeled and thinly sliced
1 1/2 cups water
1 T thickener (I used Arrowroot, can use cornstarch)

-Orange Chicken Sauce-

1 1/2 T Braggs Liquid Aminos or soy sauce
1 1/2 T water
3 T agave nectar or 5 T sugar
5 T Braggs Apple Cider Vinegar or white distilled vinegar

Preparation:
Brine your chicken. Add it to a bowl of salt and water and let it sit for 1-2 days or, even just 30 minutes. Prepare flour mixture, mix well rice flour, potato starch, salt and pepper. Prepare Orange Chicken Sauce. I just put mine in a pickle jar and shook it up, so I could keep it in the fridge until I was ready to use it. (I prepared the flour mix and orange sauce earlier in the day)

When you're ready to cook... Heat your oil - make sure it reaches 375 degrees.
In a separate bowl, lightly beat eggs. Peel and mince ginger, press garlic, chop onion and carrots.
Dip your chicken in the egg, then into the flour. Only flour a few pieces at at time and try to keep the liquid from the egg with the chicken - don't overwhelm your flour or you'll have a gloppy mess in your flour bowl. As you bread the chicken pieces, let them sit on a plate to "rest" at room temperature for a few minutes.
When you're done breading the last of the chicken, you'll be ready to start frying the first pieces. Don't crowd the pot or you'll drop the temperature too low. I put 5-8 pieces in at a time. Set the timer for 5-6 minutes. Once the pieces come out, cut one to check for doneness - it should be white, and juices should run clear. Salt immediately before it cools. Add the next batch until the chicken is all cooked and get to working on the sauce.
In another pan, sauté the garlic and ginger in a Tb of hot oil until fragrant (2-3 min), then add the onion and carrots. Stir fry those for 2-4 min, then deglaze the pan with the Orange sauce. Bring to a boil. Add the cooked chicken, and stir, coating it all over.
In a separate bowl, mix 1 Tb arrowroot (or cornstarch) with 1 1/2 cups water until it's all dissolved, add to pan, stirring and heat until sauce thickens.

Serve over brown rice and enjoy :-) We sure did.
Keep Reading >>>

Peanut Butter Rolo Cookies

Monday, May 17, 2010 0 comments
I got this recipe during my first year of college - and I love it. Not to mention it is ridiculously easy.

Ingredients:


  • Peanut Butter Cookie Mix

  • Water, Oil, Egg (as directed on cookie mix)

  • A package of Rolos (you won't use them all)


  • Directions:

  • Preheat oven according to cookie package

  • Make Peanut Butter cookie dough according to directions


  • Once the dough is made, unwrap some Rolos. You'll be making anywhere from 30-36 cookies with this recipe. I usually unwrap a handful at a time, and then unwrap more as necessary. (And, if in the end you have found you have unwrapped too many - enjoy the extra snack!)

  • Take a small amount of dough, and roll it into a ball completely covering the Rolo.


  • The balls end up being about an inch to an inch-and-a-half in diameter. As long as the Rolo is covered, and you don't see little bits of it sticking out, you'll be fine. The more dough you use per cookie, the thicker the cookie part will be so you will have to cook them a little longer - you will also get fewer cookies. It's totally a preference.


  • Bake the cookies for anywhere from 9-11 minutes. This totally depends on your oven.


  • (This is only one batch, I had another in the oven)

    You'll know the cookies are ready when the bottom edges (closest to the cookie sheet) are just slightly brown. A few of the cookies may also start to brown a very little on the top in the center. Don't over-cook them because the caramel in the Rolo will harden quickly once they cool if they are over-done.

    Once you have pulled them out of the oven, allow them to cool for 2 minutes on the cookie sheet before transfering to a cooling rack. Also, I would suggest twisting the cookies on the sheet before you try to remove them with a spatula. Sometimes the bottom of the cookie will stick to the sheet causing the melted Rolo to stay on the sheet, leaving you with a hollow cookie. Allow to cool (or not, they are DELICIOUS when eaten warm), and enjoy! Store in an air-tight container (i.e. Tupperware) to keep the carmel center chewy.

    One of my favorite, and easiest cookies to make. I promise you'll be addicted once you've tried them. And no, I haven't already eaten 5 of the ones I just made this afternoon...........
    Family Update: Justin and I found out we will be having a baby boy in September, and we couldn't be more thrilled! The pregnancy is going very well, and we love looking at (and occasionally purchasing) cute things for our little man that will be joining us in just 4 months time.
    Keep Reading >>>

    Buffalo Chicken “French Dip” Sandwiches

    Wednesday, March 24, 2010 3 comments
    Buffalo Chicken “French Dip” Sandwiches


    Really Easy with the same great flavors of buffalo wings without the mess!  Ok, so it's a mess relocated. Instead of your fingers getting messy it'll be your chin :)

    Total time: 30 minutes

    Makes 4 sandwiches

    ½ cup hot wing sauce (Franks or Wingman’s are best!)
    ½ cup chicken Broth
    2 TBSP unsalted Butter
    1 rotisserie chicken (2-3 lbs)
    or 2 oven cooked chicken breasts
    ½ cup minced celery
    ½ cup crumbled blue cheese
    ½ cup mayonnaise
    Juice of ½ lemon
    4 French rolls, split & buttered (or any dense, flat bread) the better the bread the better the sandwich!
    4 leaves leaf lettuce
    Pepper to taste

    Preheat oven to 450 degrees
    Bring wing sauce, broth, and butter to a boil. Reduce heat and keep warm for serving.
    Remove meat from rotisserie chicken in large pieces, or tear cooked chicken breast by hand in large pieces. (I prefer to use chicken breasts so I don’t have to deal with the rotisserie chicken bones… but the good thing about rotisserie is that you don’t have to cook, and the flavor is really good).

    Combine celery, blue cheese, mayonnaise, and lemon juice in a small bowl.
    Toast Rolls in oven until crisp.
    Spread each half of roll with some of the blue cheese mixture. Place lettuce on the bottom half of the rolls, top with some chicken, then season with pepper. Cover each with a top portion of the roll, cut sandwiches in half, and serve with warmed wing sauce for dipping. Enjoy with ruffled potato chips (also good dipped in the “French Dip” buffalo sauce!) or potato salad.

    an Us Update:
    Ok, now for the family note- I know you're all wondering what happened since we are no longer moving.  Well, we will be moving, just not to Georgia and not until our lease is up in June.  Here's the low-down:  Aaron had been offered and actually promised a job in GA as sales/admin director of north american sales for Guillemo corporation (manufacturer/distributer of video gaming periferals eg: joysticks, webcams, etc)which is based in France and recently expanded to the US.  He would've been working in direct correlation with his very good friend in GA.  The executives approved hiring Aaron after meeting him in Vegas but stalled to write up a contract and really define what his job would be, since the job is bits and pieces of other over-worked people's jobs.  They finally met last week to actually set in stone all of the job's responsibilities... It turns out that the job has morphed into more of an admin./accounting job and will now be based in Montreal Canada since the company accountant lives there.  They asked for more resumes and even though Aaron is still in the runnung to get it, we don't want to move to montreal and Aaron does not feel qualified for the job since it has changed so much.  There is actually another company in GA that Aaron has contact with that might hire him as their east coast sales rep- same type of company.
    Sooo... other things that are happening:
    -Registered Matthew for kindergarten today. weird. I'll have the house to myself in the mornings until 11:15!! wow.  Hopefully that'll mean a cleaner house!
    -I was asked to sub for a soloist in the Women at the Well program tomorrow so come and see it. it should be awesome. I bought a sheet, pillowcase, and shawl and made an awesome costume! I'm more excited about the costume than the singing. LOL
    -I've decided that I now that I'm going to be here for a little longer I need to do more social stuff.  I want to have a monthly girls night at my house- some nights it'll be games, other nights it'll be a movie or whatever.  bring a snack to share and we'll have a blast.  I'll let you know when the first one is when I decide.
    -I'm hosting an exercise group starting Monday at 5:30am (1hour).  We will be meeting in the grassy area behind my house. we're calling it the breakfast club. Bring 2-4 lb dumbells, a yoga mat, and water.

    wow, that was a lot more than I inteded to write, but oh well, such is life.

    Enjoy the sannies. they are scrumptious!!
    Keep Reading >>>

    Fruit Salsa and Cinnamon Chips

    Sunday, March 21, 2010 2 comments

    Just so you guys know - I used all fresh fruit because I don't like how frozen fruit tastes after thawing so even though this recipe calls for frozen fruit, the fresh kind worked just fine too :). Oh! And if you look at the picture above and think "hmm...I don't see cherries in there." It's because when I was at the store all the cherries were old and wrinkly so I didn't buy them. But next time I'm definitely going to add some if I find good quality ones at the store (maybe when they're in season? ha ha go figure). Now on with the recipe....

    FRUIT SALSA
    2 Tablespoons granulated sugar
    3 Tablespoons brown sugar
    3 Tablespoons jam, any flavor
    2 Fuji apples, peeled, cored and diced
    1/2-3/4 pound cherries, pitted and diced
    8-12 ounces frozen raspberries, thawed
    12-16 ounces frozen strawberries (unsweetened), thawed and sliced
    2 kiwis peeled and diced

    CHIPS:
    2 cups granulated sugar
    1 Tablespoon ground cinnamon
    10 10-inch flour tortillas (I used wheat ones)
    Cooking spray

    DIRECTIONS:
    To prepare the fruit salsa, combine the sugars in a large bowl, then add the jam and mix. Add remaining salsa ingredients and stir to blend. Add more sugar if desired. Cover and chill for at least 15 minutes.

    Preheat oven to 350*F

    To prepare the chips, place sugar and cinnamon in a gallon-sized resealable plastic bag. Shake to mix. Coat both sides of a tortilla with cooking spray. Cut into 8 wedges. Place wedges in the bag and shake until coated. Arrange in a single layer on baking sheet. Repeat with remaining tortillas.

    Bake for 15 minutes, turning the wedges over halfway through baking. The chips should be slightly crispy; they will crisp more as they cool (yes they will believe it or not). Let cool for about 15 minutes.

    Serve the chips with the fruit salsa. Makes 4-6 servings.

    FAMILY UPDATE:
    Am I the only one doing family updates? Anyway, Collin's two bottom front teeth are coming in....together. The tips of them look really cute. That's all.
    Keep Reading >>>

    Jalapenos Poppers

    Saturday, March 6, 2010 4 comments
    This recipe is from My sister Jenny.

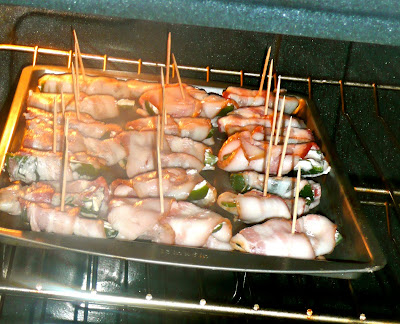
    Cut jalapenos in half, length wise. Remove seeds, unless of course you like fire. I love spice but wow... that would be HOT.

    fill with cream cheese. and wrap in half a piece of bacon. I know this is not the healthiest thing to eat but it sure is good!

    Bake at 350 until bacon is done. 
    My sister said she bakes it for about 20 minutes but I did mine for almost 45.. I guess it just depends on how you like it.


    and dip in mouth-watering Roasted Raspberry Chipotle sauce. We got this at Costco and it is to-die-for-good. I love it on my burger.


    mmmmmmm.. yum.
    Keep Reading >>>

    Good Morning!

    Thursday, March 4, 2010 1 comments
    Here's a great way to get your day going...  wheat pancakes and buttermilk syrup.

    Wheat Pancake Mix

    5 cups wheat flour
    1/3 cup baking powder
    1 cup dry powdered milk
    2 tsp. cream of tartar
    4 cups white flour
    1 cup sugar
    1 Tbsp. salt

    Mix together and store in a covered container.  To make pancakes, combine:

    3 cups mix
    2 cups water
    1/3 cup oil*
    1 egg*

    *Instead of the oil and egg, I put in 1/2 cup applesauce.  They taste great, and you cut out all that fat... which then justifies smothering them in buttermilk syrup.  Right?!

    Buttermilk Syrup

    1/2 cup margarine (1 stick)
    1 cup buttermilk
    2 cups sugar
    1/4 cup light corn syrup
    2 tsp. vanilla
    1 tsp. baking soda

    Melt the margarine in a large pot, then add buttermilk, sugar, and corn syrup.  Combine together and bring to a boil.  Once boiling, lower heat and simmer for 4 minutes.  Turn off heat, add in vanilla and baking soda.  Stir while foam reduces.  Enjoy!
    Keep Reading >>>

    Italian Steak Sandwiches (topped with a tithing testimony builder at the end)

    Saturday, February 27, 2010 2 comments
    So this is a PERFECT meal when you want something yummy but only have 15 minutes. (That happens to me a lot. Either because I am still learning how to time dinner so we eat earlier than 9:30 at night -a miracle if that happens - or because I just don't feel like making dinner sometimes).

    2 Garlic Cloves (I used dried minced garlic)
    1/8 teaspoon Red Pepper Flakes (like the kind you put on pizza...so if you have one of those packets left over from the last time you had pizza, that works perfectly)
    2 Tablespoons Olive Oil
    16 slices deli roast beef (you could get fancy with this, but I just used the Great Value a.k.a. Wal-Mart brand)
    1/2 cup beef broth
    2 Tablespoons red cooking wine (optional. But I used it and it added a great flavor)
    2 teaspoons dried parsley flakes (I didn't have this so I omitted it)
    2 teaspoons dried basil
    1/4 teaspoon salt (oops, forgot to add this when I made this, but there is plenty of salt in the deli meat in my opinion, so let's say this is optional too).
    1/4 teaspoon dried oregano (I used dried ground oregano, worked great)
    1/8 teaspoon pepper
    4 sandwich rolls, split (we never have sandwich rolls in the house since it's just the two of us -well and Collin of course, but he's not interested in bread yet- and they'll get moldy sitting around so we just used good ol' regular wheat bread slices)
    4 slices provolone cheese

    In a large skillet, saute garlic and pepper flakes in oil for 1 minute. Add the roast beef, broth, cooking wine, and seasonings; heat through. Place beef slices on bread; drizzle with the broth mixture (we didn't drizzle ours but put the left over broth from the skillet in a bowl for dipping our sandwiches instead). Top with cheese.

    We ate ours with carrot sticks on the side. YUM. (Best part? I only had one skillet to clean afterwards!)

    K, so here's my tithing testimony builder. So times are tight, as we all know, but Brenden and I have always had faith that if we pay our tithing, everything will work out. We had still been making payments to Collin's hospital bill (yeah, the one we got when he was born....he'll be 7 months on Tuesday. ACK! My baby is 7 months old!!). Well, low and behold we got a random, unexpected check from BofA (my old employer) that they sent to me to pay out my unused vacation (which I didn't think I even had any) and all that stuff since I resigned. The amount on the check was $741.23. The remaining amount of Collin's hospital bill? $741.24. That's right. A penny difference. Can you believe it? So that's one hospital bill we've been able to pay off! Thanks Heavenly Father!!
    Keep Reading >>>

    Lime Chicken Soup

    Friday, February 26, 2010 1 comments
    Just in case you want to try and squeeze one more soup into the season before the weather gets too hot.  Also, this soup is so good when you're feeling crappy.

    2 chicken breasts, cooked and shredded
    1 bunch of cilantro, chopped
    1 - 2 bunches green onion, chopped
    juice from 3 limes
    1 or 2 jalapenos, diced
    1 (3 inch) piece of fresh ginger root, peeled and sliced

    Combine ingredients in a soup pot, then cover with chicken broth (or use water and chicken bouillon cubes).  Bring to a boil, then reduce heat and simmer.  Separately, steam some white rice.  To serve, place a scoop of rice in your bowl and then cover with the soup mixture.  Don't eat the ginger!
    Keep Reading >>>

    the best peanut butter cookies ever

    1 comments
    Or at least we think so!

    1 cup brown sugar
    1 cup sugar
    2 eggs
    1 cup shortening
    1 tsp. vanilla
    2 tsp. baking soda
    1/2 tsp. salt
    2 1/2 cups flour
    1 cup peanut butter

    Cream together the sugars, eggs, shortening and vanilla.  Mix in the baking soda, salt, and flour.  Stir in the peanut butter.  Taste.  Yum.  Roll into balls and slightly mash a criss-cross (I stole a good idea from someone who used a potato masher for a cool design).  Bake at 325 for 10 minutes.
    Keep Reading >>>

    Thank you Nikki!!!

    Saturday, February 13, 2010 2 comments
    Wow!!! Thank you soooo much for this recipe! This was, no joke, the BEST meatballs I have ever had! I ended up using an entire zucchini and half a yellow squash. So to make up for it, I used 2 eggs and 1 cup of Quinoa. It had this surprise sweetness to it. It was AMAZING. I was a little worried when I started to form the meatballs because it was so moist but they cooked fine and kept their shape. (I cooked them for 20 minutes) I made the easier gravy ever (1 can of cream of mushroom soup + 1 can french onion soup) which just so happens to be the best gravy ever!

    I am embarrassed to say that it made enough for 2 families and we ate almost all of it.  Also here is a picture of the Quinoa I used. It can be found at Costco. Like Nikki said, it has so many uses and is soo good for you. I was really excited that she posted a recipe that included it so that I could try it out! (We received this for Christmas as part of our Food Storage) It can be used just like rice, and stores really good! I made it the other night and added chicken seasoning, shredded cheese and salt a pepper. The hubby loved it!

    I can't wait to make these meatballs again next week! ..and the week after that.. and the week after that..
    Keep Reading >>>

    ADOBO (aka the easiest, yummiest stew ever)

    Friday, February 12, 2010 0 comments
    This is my husbands FAVORITE recipe from the Philipines where he served his mission. I love it too and it's SO easy. You can use any meat, I like to prepare it with chicken or round roast meat.

    2-4 lbs beef, chicken, pork or combination, cubed
    1-1 1/2 cups apple cider vinegar
    1-1 1/2 cups soy sauce (or Braggs Liquid Aminos for gluten free diets)
    1-5 cloves fresh garlic, peeled and smashed with side of knife
    1 T whole peppercorns
    1-2 bay leaves

    Brown the outside of the meat, without cooking it through (just to kill surface bacteria) Throw it all into a pot or slow cooker (do not stir) and let it simmer for 1-2 hrs.
    Remove the bay leaves and serve over brown rice. Ta-da!

    Variations:
    You can add vegetables for the last 20-30 minutes of cook time, or throw lightly steamed veggies into the stew just before serving.
    This can also be done with vegetables in place of meat, just reduce the cooking time and periodically check veggies for tender-crisp consistency. Green Beans, Broccoli and carrots are good this way.
    You can put the peppercorns in a tea ball and remove before serving, but I like to leave them in for a spicy bite :) I'm sure you could also use ground black pepper towards the end of cooking instead.

    I hope you enjoy it!
    Keep Reading >>>

    Vinegar Taffy

    Tuesday, February 9, 2010 1 comments


    First of all- thanks, everyone, for going along with this idea- I'm really excited about it!
    I wasn't going to post anything until I moved but this looked so fun to do with my kiddos that I thought I'd share. I found it in The Friend. It's a very simple recipe- if you want to get fancy shmancy you can find a lot of different recipes online.  I know, I looked.  My kids are going to make taffy to give to their friends for valentines day.
    Note: Kids will need an adult’s help for this recipe, which is great fun for a group to make in a party that used to be known as a taffy pull.

    2 cups sugar
    1 cup vinegar
    butter to grease hands and surfaces
    A few drops of food coloring (optional)
    wax paper to wrap taffies (optional)

    1. In a large skillet over medium-high heat, stir the sugar into the vinegar until dissolved.

    2. Let boil until it just reaches the hard-ball stage (~250áµ’-265áµ’). (If you don’t have a candy thermometer, drop about 1/4 teaspoon of the liquid into a half cup of very cold water and feel it with your finger. If it is round and hard, it is done.)

    3. Remove from the heat, pour into a large, lightly buttered platter, and let cool just until you can handle it (the hotter you can work with it, the better—maybe an adult can start it for you until it cools slightly more for you).

    4. Grease your hands as little as possible with the butter, take a small handful of the taffy, and stretch it out about 18″ (.5 m). Then double it back and stretch it out again. Keep repeating this until it is too stiff to pull anymore and is as white in color as you can make it. Then twist it while you stretch it one last time till it looks like a rope about 3/4″ (2 cm) thick, place it back on the platter, and set aside until it hardens to taffy consistency.

    5. When the taffy i hard, break it into 1″ (2.5 cm) lengths and enjoy! Any leftover pieces should be wrapped with waxed paper and stored in an airtight container in a cool, dry place.

    A few things to keep in mind:
    1. If you live at a higher altitude lower required temperature to between 220áµ’-240áµ’
    2. Why pull the taffy? Stretching and pulling the taffy allows air to blend in with it, making it lighter and chewier, and giving it a smooth consistency and a glossy appearance. If you don't stretch it enough, it will be harder to eat so stretch the heck out of it! The longer the better!
    3. Make sure to have the ingredients already measured out beside the stove before beginning so that nothing cooks too long- this is an exact timing process.

    Each child can pull his own small piece of taffy, but it’s more fun to have a two-person taffy pull, stepping back from one another to stretch out the taffy.
    This would be a fun pioneer activity to do on Pioneer or Independence day!

    BTW- Megan was in her school talent show last night and did so awesome!  She sang Tomorrow from Annie.  We took her to get ice cream afterward.  Her teacher came to see her in it (she was the only one from her class) and told me that the essay Megan had written last week for the multi-campus essay contest was one the best in the class and that the judges looked at it and asked if a 1st grader had really written it. Go Meggie!

    Stephanie
    Keep Reading >>>

    Hominy Soup

    Sunday, February 7, 2010 3 comments
    First of all, thanks Stephanie for setting this up! Your a genius! I love it already!

    I'm a picture kind of a girl so here is one of my absolutely most favorite soups. 
    The recipe is from my sister and she calls it Hominy Soup.

    Hominy is.. I belive from the family of corn. It looks like this:

    Ingredients:

    1 can hominy
    1 can yellow sweet corn
    1 can black beans (drained and rinsed)
    1 can stewed diced tomatoes
    1 can green chilies
    1 onion diced
    2 breasts of chicken, boiled and then diced.
    2 tablespoons butter

    Lime
    Pepper-jack Cheese
    Cilantro
    Sour Cream
    Tortilla Chips

    Start by boiling the chicken. When cooked all the way through save the water form the soup but strain the fat out.  Set the chicken and water aside.

    Place butter and onions in pot and fry until the onions appear clear, then add green chilies. Then add all the other cans, keeping the water. Add diced chicken. Mix chicken flavoring in the left-over water and add to soup.  Bring to a roiling boil and then your done!

    I like mine really soups but Logan likes him chucky, but its delicious both ways!

    Just pile up the cheese, cilantro, sour cream, chips and lime and you will LOVE it!

    enjoy!

    Clarissa
    Keep Reading >>>

    Taco Soup

    0 comments
    So, out here in the DC area we just got completely dumped on with snow (22 inches here, with some areas getting as much 46 inches!). Starting Friday at about 11:00AM until Saturday at about 4:00PM it was pretty much a blizzard. A little crazy, no? In light of all the snow, our thoughts have turned to things warm and cozy like hot chocolate, fireplaces and soup. I thought I'd share one of my most favorite (and easiest) soup recipes.

    Taco Soup:
    1 can Tomato Sauce
    1 can Stewed Tomatoes
    1 can Kidney Beans
    1 can Corn
    1 can Cream of Potato Soup (Yes, you read that correctly)
    1/2 lb. of ground beef
    1/2 packet (about 1/8 cup) of Taco Seasoning

    In a pot, put all canned ingredients and allow to heat while browning the beef (I usually have it pretty close to high in order to get it boiling). Brown ground beef and season with Taco Seasoning according to directions. Once the beef is done, add it to the pot. Once the soup is boiling, turn the heat down until it is simmering. At this point, it is totally up to you how long you want to soup to simmer. I usually let it simmer for about a 30-45 minutes - it allows the flavors to blend well. Just make sure to stir it every once in a while.

    Toppings:
    Shredded Cheese
    Fritos
    Sour Cream

    These toppings, in my opinion, is what make the soup so good. If you add the sour cream, it is best to stir it in, not just leave it as a glob. But again, it is up to personal preference - Justin doesn't put the sour cream in his soup.

    This should make enough for a family with a few small kids. However, if you need more, this recipe is easily doubled - use 2 cans of everything and a full pound of beef.

    I hope you enjoy it! It is definitely one of my favorite comfort foods. We ate it yesterday evening while we were snowed in, and it was perfect. Church was cancelled today, and we'll be stuck for a few more days so I guess I'll have to come up with some more winter recipes

    :) Amelia
    Keep Reading >>>

    Santa Fe Salsa

    Sunday, January 31, 2010 2 comments
    I love this idea. I will definitely be coming here for ideas when I am looking for something tasty and new to eat.

    I'll contribute one of my very favorite salsa recipes. It comes from one of my very favorite Aunts :) This is so simple to make, and it is quite healthy (we have some in our fridge right now). But, it makes a LOT! It's really the perfect salsa for a party, but you will need a big bowl for it - I'm talking really big.

    Susan's Salsa

    2 bunches green onions, sliced
    (Optional) 2 small avocados sliced into thin pieces (I usually cut it while it is in the skin, and I cut in horizontally and then vertically with small cuts - with the vinegar and juice in this recipe, the avocados stay green for a very long time.)
    1/2 red pepper
    1 can black beans, drained and rinsed well
    1 can black-eye peas, drained (I also usually rinse these)
    1 can corn
    2 cans Ro-Tel (chopped tomatoes & chilies - I use one original and one hot, but do whatever mix you'd like)
    1/4 cup vegetable oil
    1/8 cup vinegar
    chopped cilantro (a handful)
    juice of one lime

    Mix well and refrigerate. YUM!

    So, I hope you enjoy it. There isn't any salt in it, but I've found that the salt from whatever chips you serve it with is enough.

    We are doing well here in Virginia. This winter has been great! We've gotten 26 inches of snow so far (20 of that was in one day...) We're also expecting our first baby in September. We're super excited. Seriously loving this idea! I'm so excited to be a part of this!

    :) Amelia Poll
    Keep Reading >>>

    Beef and Quinoa Meatballs - SOOO Good!! (And good for you too!)

    3 comments
    I got this from Whole Foods Recipes and it is awesome. I don't know if many people know the health benefits that Quinoa (pronounced kwi-noa) offers, so let me share that really quick and then on to the recipe!

    In contemporary times, this crop has become highly appreciated for its nutritional value, as its protein content is very high (12%–18%), making it a healthy choice for vegetarians and vegans. Unlike wheat or rice (which are low in lysine), quinoa contains a balanced set of essential amino acids for humans, making it an unusually complete protein source. It is a good source of dietary fiber and phosphorus and is high in magnesium and iron. Quinoa is gluten-free and considered easy to digest. Because of all these characteristics, quinoa is being considered a possible crop in NASA's Controlled Ecological Life Support System for long-duration manned spaceflights. (wikipedia) Great for food storage!

    So simply put, it's healthy! :) (and if you've ever had quinoa before as a breakfast cereal -similar to couscous or cream of wheat - and don't like the flavor of it by itself, you can't taste it in the meatballs at all...just an FYI).

    You will Need:
    Nonstick cooking spray
    1 pound (95-percent) lean ground beef
    3/4 cup cooked quinoa (*see below)
    1/4 cup finely chopped onions (I used dry onions from food storage and those worked very well)
    1/4 cup grated carrots
    1/4 cup grated zucchini
    2 tablespoons ketchup
    1 tablespoon garlic
    1 tablespoon soy sauce
    1/2 teaspoon pepper
    1/2 teaspoon salt
    1/4 teaspoon dried oregano
    1/4 teaspoon dried thyme
    1 egg

    1. Preheat oven to 500*F. Line a large baking sheet with foil then grease with cooking spray; set aside.

    2. In a large bowl, mix together beef, quinoa, onions, carrots, zucchini, ketchup, garlic, soy sauce, pepper, salt, oregano, thyme and egg until well combined. Shape beef mixture into 16 balls and transfer to prepared baking sheet. Roast until cooked through and golden brown, 12 to 15 minutes. Serve hot.

    (*Note: To cook quinoa, bring 1 cup water to a boil in a small pot. Pour in 1/2 cup quinoa, cover and simmer until water is absorbed, 10 to 12 minutes. Set aside off of the heat for 10 minutes then fluff with a fork. Makes about 1 1/2 cups.)

    Serve with your favorite pasta and marinara sauce or on a hoagie with cheese for a dynamite meatball sub sandwich.

    Enjoy! :)

    ~Nikki Saline

    (oh and here's my family update. Collin (our 6 month old son for those of you who don't know) woke up every hour last night starting from 12am-3am. Then he screamed his head off from 3-5am. Teething? Gas? I don't know. But after I finally got him to sleep around 5:30 this morning, he slept until almost 10! I think he was pretty exhausted. I felt bad for him but he's all smiles today thank goodness!)
    Keep Reading >>>

    Championship Bean Dip

    1 comments
    Hey Everyone! This is a family fav of mine, but we use it for just about every family gathering, and its always a hit. We originally found it in the Taste of Home Magazine. Hope you like it :)

    1 can Refried Beans
    3 oz Cream Cheese softened
    1 jar of Picante Sauce
    1 cup Monterey Jack Cheese
    1 cup Cheddar Cheese
    3/4 cup Sour Cream
    1 Tbsp Chilli Powder
    1/4 tsp Cumin

    Tortilla Chips

    Mix together and cook for 1-2 hrs in a crock pot and ready to serve.
    Keep Reading >>>

    Great Idea Steph!

    Saturday, January 30, 2010 0 comments
    Steph you are full of great ideas that will keep us connected and laughing for years to come! Please keep Tweeting too, 'cause I get more than my "Daily Dose" of laughter from your hilarious children.

    Now for my first addition to The Lunch Lady Lounge... A SuperBowl Yummy

    In honor of the New Orleans Saints (or Webelos, as the Thompson's boys renamed them) going to the SuperBowl for the very first time here is #35's favorite SuperBowl Treat.

    ~Piggies in Bacon & Brown Sugar

    1 package Li'l Smokies
    1 Package Bacon
    Brown Sugar

    Cut uncooked Bacon strips in half and wrap each Li'l Smokie.  Lay in rows in a 9x13 glass pan & cover with brown sugar. Bake at 350 degrees until bacon is crisp and brown sugar begins to melt... about 20 minutes.

    ~Alicia
    Keep Reading >>>

    Welcome Ladies!! Chocky Chip Cookies, Anyone?

    4 comments
    Hey crazies- here is the first post EVAH!  I am so sad (but not)that we are moving so don't let me down by not posting on this here blahhg.  When you write a recipe make sure to add a personal note about what's up.  Thought I'd post a Chocolate Chip recipe that is SOOOOO good. Elise knows- she was at choir on Sunday :o)
    Here you go!


    Kim's Chocky Chip Cookies
    Mix the Following:
    2 eggs
    1/3 c butter
    2/3 c crisco
    1 c brown sugar
    1 c white sugar
    1 c sweetened coconut flakes


    Mix seperately the following ingredients:
    2 c flour
    2 c oatmeal (quick oats ok)
    1 package (~3oz) instant vanilla pudding
    2 tsp baking powder
    2 tsp baking soda
    1 tsp salt


    Combine the wet and dry mixtures then add:
    1 c chocolate chips
    1 c nuts (walnuts are preferred)
    Form into heaping 1 Tbs cookies (will be crumbly, so mush into form). Bake 350 degrees for 10-12 minutes (test the time in your own oven and take note).  Cookies should be very slightly browned and still jiggly soft.  They will set up as you cool on the pan. Eat immediately with milk.
    Enjoy!


    BTW- you don't have to use butter and crisco- it really just calls for 1 c margarine- use your discretion


    BTW#2 I just got a ton of boxes from a friend yesterday- i can't believe we're moving!


    -Steph


    ok, wait....BTW#3 When you post a recipe, please add a label which will be in the bottom right corner of the posting window.  ie: Appetizer, Soup/Salad, Beverage, Side, Main, Dessert, Other
    Awesome... that's it.... I think.
    Keep Reading >>>